Showing posts with label Tutorial.. Show all posts

Sunday, December 21, 2014

Nativity Set, Tutorial.

Tutorial ..

I made this tutorial in a hurry. My Rascal cat 'Magster' kept disturbing me through out the tutorial. 

I hope this tutorial is helpful. (Please donot post this tutorial as yours).
Enjoy! 

Let's get started:

Mary:
Materials:
Craft stick or a wooden ice-cream stick.
Blue and white felt, and little bit of flesh color felt
Black permanent marker
Needle and thread to sew.

Method:
1. Cut Nine and half by three and half inches of blue felt for Mary's skirt.

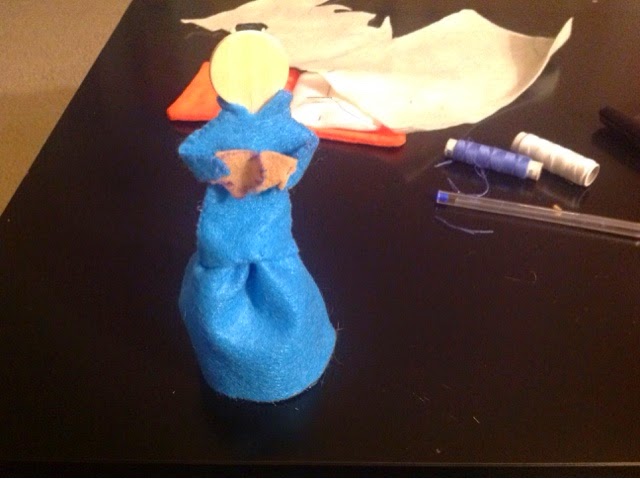
2. Make a gather skirt, place the skirt on the craft stick below the waist and pull up the gathers tightly. Sew the raw ends together. This seam will form the back of the skirt. Arrange the gathers neatly so that the figure can stand well.


3. Cut a basic bodice shape from two layers of blue felt. It need not be perfect. I have not taken the measurements, just cut the felt based on the size of your craft stick.

4. Cut the neck to form a slight round shape. Cut slightly near the arm holes to give a shape to the bodice. Join the row ends near the shoulders. Put the bodice piece on the craft stick through the head. Join the rows at each end from arm hole till the waist and sew the front and back of the bodice to the skirt.


5. Cut a small piece of rectangle approximately 4 by 2 and half inches. Fold the piece in half, place this piece near the arm hole and sew around the arm hole and join the row ends of the sleeve, this seam will go below the hand. Repeat the same thing for the other hand.
6. Using flesh color felt, and keeping this diagram as guide cut two hand pieces, and sew them in place.


7. Using white felt cut a length of rectangle for the veil, which should be long enough to go around the head and fall below the waist.


8. Place the veil on the craft stick as shown in the picture and fold the felt little bit near the top of the head and sew in place, also catch the veil, near the shoulders as shown in the picture.
9.with the black permanent marker, mark the hair and the facial features.
10. Bring the hands near the chest, and sew in place.

Joseph:
Materials,
Mustard color, flesh and white felt.
Craft stick
Brown Mohair yarn
Glue
Black permanent marker 
Sewing thread and needle

Method:
1.Make the skirt and join the bodice piece as far Mary, using mustard color felt. You can cut the skirt piece little bit shorter than Mary, since we don't need too many gathers, but make sure that the figure stands well. Do not make the sleeves at this point.

2. Using white felt and keeping the diagram as a guide mark the shape of the cloak and cut it out. Join the row ends near the shoulders and place the cloak around the figure, noting that the open sides will come in the front. 


3. Now make the sleeves as far Mary, using the white felt. Catch the front of the cloak on either sides from the shoulders below till the waist.
4. Attach the hands as far Mary, and bring the hands together to the front and sew in place as shown in the picture.

5. Using the mohair yarn, stick the hair and the beard, if you do not wish to use the yarn, the hair and the beard can be painted using brown permanent marker.


6. Using black marker, mark the facial features.

Shepherd:

Materials:
Dark and light brown felt and cream felt (for hands)
Craft stick
Pipe cleaner 
Glue
Permanent marker
Sewing thread and needle.

Method:
Make the figure as far Joseph. Use light brown for the gown and dark brown for the cloak. Make the hands using cream felt.
Cut six and half inches of brown pipe cleaner, if you do not have brown, use white pipe cleaner and paint it brown using the permanent marker.
Fold the pipe cleaner at the top to form a stick, place the stick near the hand sew in place as shown in the picture.
Mark the hair and the facial features using the black and the brown permanent markers
For the head cloth, cut a piece of light brown felt in a 'U' shape and place the cloth around the head and catch the sides, as shown in the picture.

The Three Wise Men.

Materials:
Three different color printed felt for the gown, contrasting three different plain felt for the cloak and the head dress.
Three Craft sticks
Glue
3D 'Gift' stickers
Sewing thread and needle
Permanent marker.

Method:
Make the figures as far Joseph. Use printed felt for the gown and plain felt  for the cloak. Make the hands using cream felt.
Bring the hands to the front and sew in place. Stick the 'Gift' stickers in the front as shown in the picture.
For the head dress cut the felt in different shapes like cone, rectangle etc. join the ends and apply some glue and place the hat in place.
Mark the facial features.

Baby Jesus:

Materials:
Light pink or light yellow small Pom-Pom or a small wooden bead for the head
Small rectangular piece of cream or white felt for the body.
Small piece of white felt for the hood
Small quantity of stuffing
Permanent marker, brown and black.
A matchbox tray for the Manger.
Four three inches Popsicle sticks for the stand.
Two push pins
Glue
Some dry grass.

Method:
1. Using the rectangular piece of felt, form a tube and sew the row ends. Place the Pom Pom on one open end and sew in place. 


2. Stuff the tube slightly through the other open end and close the opening.
3. Use the hood piece and place the piece on the head and sew in place, catching at the sides and at the back.
4. Mark the facial features.
5. To make the manger, color the matchbox tray brown. Put some dry grass and place the baby inside.

6. To make the stand, take two pieces of Popsicle sticks and apply some glue and form a cross shape, repeat the same thing form the other side. Push a push pin on both the pieces and glue the push pins. After the glue is dry, place the manger on top of this.


Sheep:
Materials:
White felt
White pipe cleaners
Stuffing
Permanent marker 
Sewing thread and needle 

Method:
Using two layers of white felt, draw an animal shape and sew all around , leaving the top open for stuffing. Turn right side out and stuff. Close the opening after stuffing.


Cut two small pieces of white pipe cleaners and fold them in 'V' shape and sew them in the front and at the back as shown in the picture.


Cut two small 'U' shapes for the ears and small piece for the tail using white felt and sew in place.
Using black marker mark the eyes and the nose.


Tuesday, May 6, 2014

Portable cardboard doll house.

Longtime ago I had purchased a portable cardboard doll house from the Dollar tree. I was so much inspired to make one myself. I tried making one. It's quiet easy and simple. I have drawn and painted the interiors and the  exteriors myself. But there are other alternatives, you can stick some pictures. Magazines and greeting cards are very good sources to get some interesting stickers. There are beautiful 3d stickers available at the craft stores. Joelle's boutique and Martha Stewart crafts are few examples. Also furniture and other things can be cut out of felt and later can be stuck on the walls.


Let's get started.
Materials:
Cardboard ( the cardboard should be hard but flexible enough to fold where ever necessary)
Pencil, eraser etc if you are drawing by yourself
Color pencils, 
Permanent markers,
Water colors or acrylic paint
(Note: I have used all the above things to paint. To paint smaller things I have used color pencils and permanent markers. To paint the larger areas I have used water colors and acrylic paint. You can use what ever you are comfortable with.)
Glue.
White sheets.
Scissors.
Stickers, felt etc to decorate the interiors if you wish.

Method :

1. Take a cardboard measuring 17 by 12 inches ( note: you might want to measure the cardboard little extra since 17/12 inches is the actual measurement of the house.) 

2. Measure 4 inches and fold the cardboard at both ends. Both the folding should measure 4 inches. These are the side walls of the house. The side walls should measure 12 inches in height and 4 inches in width. (Exterior of the house)


3. The center part of the house should measure 9 inches wide and 10 inches in height. When the house is formed both the side walls should meet the center point of the house. ( Interior of the house )


4. Cut the shape of the house in the center and on the side walls as shown in the picture. On the side walls measure 5 and 1/2 inches from the top and create a folding. This will be the roof. Repeat this on the other end as well. At the center of the house make three holes leaving 1 and 1/2 inches gap between each hole. And on the side walls make 2 holes on each side as seen in the picture. 


5. Take another piece of cardboard measuring 9.5/ 4.2 inches for the floor. Cut the edges of the floor as shown in the picture so that the floor should fit inside the holes that were created on the walls before. There should be 1 and 1/2 inches gap between each step. Flooring can be painted or a decorative paper that resembles a floor can be pasted.


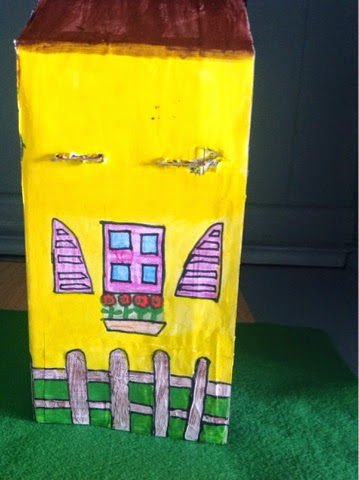
6. If the cardboard is not plain then stick some plain white sheets before you draw or stick anything on the walls. These are the side walls from outside the house. 

On the other side wall I stuck a picture from a greeting card to give a feeling of a back yard.


This is the front part of the house.

 
7. Since the kitchen is already drawn there is lot of space to add some furniture. Kitchen table and a beautiful  tea set will give a nice charm to a doll house. I added a miniature sink on one of the side walls.


 Couch etc can also be added. I made bed room on the first floor. Cot, arm chair, fire place are all an excellent options. 

Fire place can be drawn on the wall to save space.
Adding some dolls inside a doll house can be even more charming.


Inexpensive doll house furniture are available at Dollar tree. I have used doll house furniture from 'Calico critters'. You can also cut out dolls from cardboard and all the features can be painted. 
The best part is, this house will not occupy any space. After playing it can be folded and kept in a book shelf. They is also a scope to show off your painting and drawing skills :).

I hope this is a fun project and you all will have lot of fun.

Enjoy!
Revs......


Love to share some comments from my knitting forum.


  Author    Message  
#   ^ 
 May 6, 14 16:03:42
Joined: Jun 26, 12
Messages: 351
Feedback: 0/0.0%
Location: in hiding :)
Online
Greetings,

I tried making this doll house I hope you like it...
I have also posted the tutorial on my blog 
http://revathiakshay.blogspot.com

Thanks and Regards,
Revathi...


Revathi akshay
 
 
#   ^ 
 May 6, 14 16:10:40
a regular here
Joined: Apr 5, 12
Messages: 6648
Feedback: 0/0.0%
Location: Sydney
Online
You did a great job, looks great.
 
bettyirene
 
#   ^ 
 May 6, 14 16:18:15
a regular here
Joined: Feb 1, 11
Messages: 3776
Feedback: 0/0.0%
Location: Bryant Pond, Maine in the western hills of Maine!
its adorable!
 
 
#   ^ 
 May 6, 14 16:25:29
a regular here
Joined: Jul 30, 12
Messages: 1581
Feedback: 5/100.0%
Location: Cape Cod Massachusetts
Yeah, back to my childhood i go.
Great job!
 
The cure for anything is salt water....sweat, tears or the sea.
 
#   ^ 
 May 6, 14 16:36:01
a regular here
Joined: Sep 3, 12
Messages: 1484
Feedback: 3/100.0%
Location: in hiding :)
I am learning to make the little dolls, I guess I am reverting back to mine as well.
 
Punkin51
 
#   ^ 
 May 6, 14 17:03:38
a regular here
Joined: Mar 29, 12
Messages: 376
Feedback: 0/0.0%
Location: in hiding :)
Online
So sweet and so fun. Great job.
 
lil rayma
 
 
#   ^ 
 May 6, 14 17:11:07
Joined: Jun 26, 12
Messages: 351
Feedback: 0/0.0%
Location: in hiding :)
Online
Punkin51 wrote:
I am learning to make the little dolls, I guess I am reverting back to mine as well.


That's great. Even I want to learn to make little dolls. How are you learning? What kind of dolls you are making. Any suggestion and help will be appreciated. I made the paper doll and a florescent colored dress peg doll by myself.
 
Revathi akshay
 
#   ^ 
 May 6, 14 17:51:25
a regular here
Joined: Jul 30, 11
Messages: 31958
Feedback: 1/100.0%
Location: beenleigh se queensland
It looks great,fabulous work.   
 
kiwiannie
 
#   ^ 
 May 6, 14 18:29:19
a regular here
Joined: Jul 24, 12
Messages: 619
Feedback: 0/0.0%
Location: Florida
Certainly more do-able/affordable.......Is adorable!
 
Tallie9
 
#   ^ 
 May 6, 14 19:46:22
Joined: Sep 8, 13
Messages: 492
Feedback: 0/0.0%
Location: Trenton, Ontario Canada
THat's so cute! I used to make Barbie houses out of cardboard boxes when I was a kid.
 
AlanaBlakely
 
#   ^ 
 May 7, 14 06:35:09
a regular here
Joined: May 12, 11
Messages: 1472
Feedback: 0/0.0%
Location: LIVERPOOL UK
Its great.i love it
 
mopa2282
 
 
#   ^ 
 May 7, 14 07:59:42
a regular here
Joined: Nov 3, 11
Messages: 5636
Feedback: 2/100.0%
Location: in hiding :)
Your craft brings back fond memories of when I was a Camp Fire leader..this was a project that the girls did. We gathered cardboard boxes ones with dividers in them and created different rooms..I got wallpaper books to use for the decor and we made different items to go into the dollhouse..I often wonder if those girls remember the fun we had in doing this...PS: Yours is very nice..and the fun you had in making it.
 
jonibee
 
#   ^ 
 May 7, 14 08:45:04
a regular here
Joined: Apr 4, 11
Messages: 2533
Feedback: 0/0.0%
Location: Puget Sound
I love it! Wish I had thought of this when my girls were little (or even when my granddots were little.)
 
Can't knit and type at the same time, 
 
#   ^ 
 May 7, 14 09:50:30
a regular here
Joined: Mar 15, 13
Messages: 1409
Feedback: 0/0.0%
Location: SoCal
Nice dollhouse! Nice accessories, too!
 
Tapraol
 
#   ^ 
 May 7, 14 10:21:24
a regular here
Joined: Jul 1, 11
Messages: 2205
Feedback: 0/0.0%
Location: N.E. Kansas
This sure brings back memories! Thanks for sharing. Very nice work.
 
I wish I were as thin as I was when I thought I was fat.


  Author    Message  
#   ^ 
 May 7, 14 11:49:05
Joined: Jun 26, 12
Messages: 351
Feedback: 0/0.0%
Location: in hiding :)
Online
I am so happy that I brought back all your childhood memories. When I was a child I never made one. Now at the age of 30 I am making doll houses 
 
Revathi akshay
 
 
#   ^ 
 May 7, 14 14:31:11
a regular here
Joined: May 22, 12
Messages: 1131
Feedback: 0/0.0%
Location: Lancaster, Ohio
So cute. Well done.
 
FranVan
 
#   ^ 
 May 7, 14 18:43:31
a regular here
Joined: Feb 7, 11
Messages: 8413
Feedback: 22/95.5%
Location: New York
How creative, nice dollhouse.
 
yona
 
#   ^ 
 May 7, 14 21:42:39
Joined: Jun 26, 12
Messages: 351
Feedback: 0/0.0%
Location: in hiding :)
Online
Thanks a lot everyone 
 
Revathi akshay