I made this tutorial in a hurry. My Rascal cat 'Magster' kept disturbing me through out the tutorial.
I hope this tutorial is helpful. (Please donot post this tutorial as yours).
Enjoy!
Mary:
Materials:
Craft stick or a wooden ice-cream stick.
Blue and white felt, and little bit of flesh color felt
Black permanent marker
Needle and thread to sew.
Method:
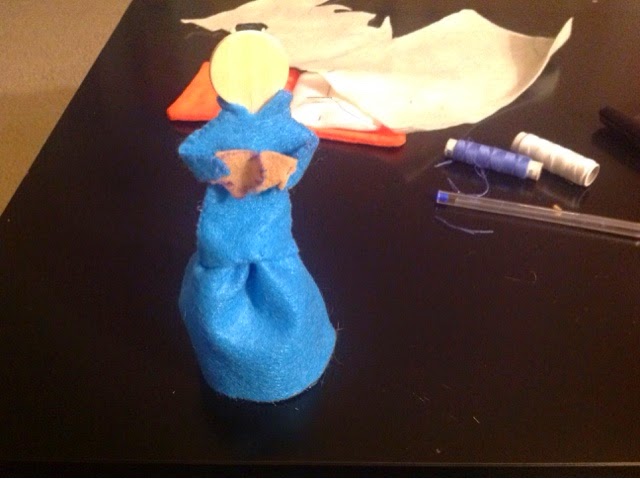
1. Cut Nine and half by three and half inches of blue felt for Mary's skirt.
2. Make a gather skirt, place the skirt on the craft stick below the waist and pull up the gathers tightly. Sew the raw ends together. This seam will form the back of the skirt. Arrange the gathers neatly so that the figure can stand well.
3. Cut a basic bodice shape from two layers of blue felt. It need not be perfect. I have not taken the measurements, just cut the felt based on the size of your craft stick.
4. Cut the neck to form a slight round shape. Cut slightly near the arm holes to give a shape to the bodice. Join the row ends near the shoulders. Put the bodice piece on the craft stick through the head. Join the rows at each end from arm hole till the waist and sew the front and back of the bodice to the skirt.
5. Cut a small piece of rectangle approximately 4 by 2 and half inches. Fold the piece in half, place this piece near the arm hole and sew around the arm hole and join the row ends of the sleeve, this seam will go below the hand. Repeat the same thing for the other hand.
6. Using flesh color felt, and keeping this diagram as guide cut two hand pieces, and sew them in place.
7. Using white felt cut a length of rectangle for the veil, which should be long enough to go around the head and fall below the waist.
8. Place the veil on the craft stick as shown in the picture and fold the felt little bit near the top of the head and sew in place, also catch the veil, near the shoulders as shown in the picture.
9.with the black permanent marker, mark the hair and the facial features.
10. Bring the hands near the chest, and sew in place.
Joseph:
Materials,
Mustard color, flesh and white felt.
Craft stick
Brown Mohair yarn
Glue
Black permanent marker
Sewing thread and needle
Method:
1.Make the skirt and join the bodice piece as far Mary, using mustard color felt. You can cut the skirt piece little bit shorter than Mary, since we don't need too many gathers, but make sure that the figure stands well. Do not make the sleeves at this point.
2. Using white felt and keeping the diagram as a guide mark the shape of the cloak and cut it out. Join the row ends near the shoulders and place the cloak around the figure, noting that the open sides will come in the front.
3. Now make the sleeves as far Mary, using the white felt. Catch the front of the cloak on either sides from the shoulders below till the waist.
4. Attach the hands as far Mary, and bring the hands together to the front and sew in place as shown in the picture.
5. Using the mohair yarn, stick the hair and the beard, if you do not wish to use the yarn, the hair and the beard can be painted using brown permanent marker.
6. Using black marker, mark the facial features.
Shepherd:
Materials:
Dark and light brown felt and cream felt (for hands)
Craft stick
Pipe cleaner
Glue
Permanent marker
Sewing thread and needle.
Method:
Make the figure as far Joseph. Use light brown for the gown and dark brown for the cloak. Make the hands using cream felt.
Cut six and half inches of brown pipe cleaner, if you do not have brown, use white pipe cleaner and paint it brown using the permanent marker.
Fold the pipe cleaner at the top to form a stick, place the stick near the hand sew in place as shown in the picture.
Mark the hair and the facial features using the black and the brown permanent markers
For the head cloth, cut a piece of light brown felt in a 'U' shape and place the cloth around the head and catch the sides, as shown in the picture.
The Three Wise Men.
Materials:
Three different color printed felt for the gown, contrasting three different plain felt for the cloak and the head dress.
Three Craft sticks
Glue
3D 'Gift' stickers
Sewing thread and needle
Permanent marker.
Method:
Make the figures as far Joseph. Use printed felt for the gown and plain felt for the cloak. Make the hands using cream felt.
Bring the hands to the front and sew in place. Stick the 'Gift' stickers in the front as shown in the picture.
For the head dress cut the felt in different shapes like cone, rectangle etc. join the ends and apply some glue and place the hat in place.
Mark the facial features.
Baby Jesus:
Materials:
Light pink or light yellow small Pom-Pom or a small wooden bead for the head
Small rectangular piece of cream or white felt for the body.
Small piece of white felt for the hood
Small quantity of stuffing
Permanent marker, brown and black.
A matchbox tray for the Manger.
Four three inches Popsicle sticks for the stand.
Two push pins
Glue
Some dry grass.
Method:
1. Using the rectangular piece of felt, form a tube and sew the row ends. Place the Pom Pom on one open end and sew in place.
2. Stuff the tube slightly through the other open end and close the opening.
3. Use the hood piece and place the piece on the head and sew in place, catching at the sides and at the back.
4. Mark the facial features.
5. To make the manger, color the matchbox tray brown. Put some dry grass and place the baby inside.
6. To make the stand, take two pieces of Popsicle sticks and apply some glue and form a cross shape, repeat the same thing form the other side. Push a push pin on both the pieces and glue the push pins. After the glue is dry, place the manger on top of this.
Sheep:
Materials:
White felt
White pipe cleaners
Stuffing
Permanent marker
Sewing thread and needle
Method:
Using two layers of white felt, draw an animal shape and sew all around , leaving the top open for stuffing. Turn right side out and stuff. Close the opening after stuffing.
Cut two small pieces of white pipe cleaners and fold them in 'V' shape and sew them in the front and at the back as shown in the picture.
Cut two small 'U' shapes for the ears and small piece for the tail using white felt and sew in place.
Using black marker mark the eyes and the nose.