Wednesday, February 19, 2014

Miss. Polka Dot knitting pattern

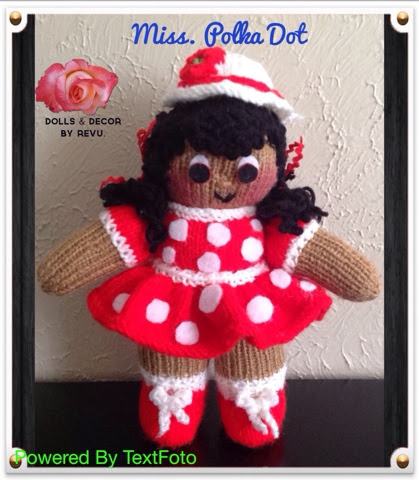
Miss polka dot  ( knitting pattern.)


Materials:
A pair of USA #2 knitting needles
Worsted yarn: red, white, light brown and black
Poly fill for stuffing
Cardboard pieces to insert inside the shoes
White felt to make polka dots.
Two circles of black and white felt for the eyes
Blush or red colored pencil to color the checks 
Ribbon
Tapestry needle.
 Aleene's fast grab tacky glue or any other craft glue.
'F' or 3.75mm crochet hook to make the shoe lace and the back bow.

Measures: approximately 8 1/2" in height excluding the cap.  The doll can stand without any support once the cardboard soles are inserted and it can sit when it's leaned against a wall etc.

Skills required : cast on, cast off, knit, purl, increase and decrease.

Method:

 Shoes  and legs (make two alike )

Begin at the sole and using Red color  cast on 8 sts.

Row 1: increase knit wise into every stitch  16 sts 
Row 2: purl 
Row 3: knit
Row 4: purl
Row 5: increase knit wise into every stitch  (32 sts)
Row 6: purl
Row 7: k 10, (k2tog,k2) 3 times, k10 - 29 sts
Row 8: purl
Row9:  k10,(k2tog, k1) 3times, k10 - 26 sts
Row10: purl
Row11: k 10, ( k2tog) 4 times , k 8 - 22 sts 
Row 12: purl 
Break off the yarn and join white color for the socks .
Continue and work in st-st for 8 rows beginning with a k row.
Next row:   k1, (k2tog to last st) ,k1 -12 sts
Next row:  k2tog, k8, k2tog - 10 sts 
Break off the yarn and join light brown for the legs. 
Increase knit wise into every st 20sts 
Beginning with a purl row work in st-st for 17 rows
Cast off.

To make up :
Join the row ends together, leaving the top open for stuffing. Place the leg on a cardboard and trace the sole, cut four pieces in order to get stiff sole. Insert two cardboard pieces  for the sole for each leg and then stuff the legs firmly, but do not fill the legs completely. At the top edge leave 1/8th inches with out filling in order to insert the legs easily inside the body. Keep these aside for now till they are  required .

Shoe lace ( make two ) 
With white yarn and using a crochet hook make a chain of single crochet for about 6 to 7 inches or a twisted chord. Make a bow and sew in the front of the shoes.

Body and Head.

Begin at the lower body of the doll and with white color cast on 40 sts.
Beginning with the knit row st-st for  11 rows .
Break the yarn and join red color for the upper body. 
Beginning with a purl row st-st for 11 rows .
Next row (k1,k2tog to last st )k1 - 27 sts.
Purl 1row
Break the yarn and join light brown color for the head.
Next row : (k1, inc 1 to last st, )k1 -40sts
Purl one row. 
Next row: (k5, inc knit wise in the next st ) 6 times, k4 -46 sts.
Beginning with the purl row st -st for  17rows.
Next row: (k2, k2tog to last 2 sts) k2 - 35 sts.
Purl 1 row.
Next row:( k1, k2tog to last st, )k2- 24 sts.
Purl 2tog to end 12 sts.
Leave the sts on the needle and cut the yarn leaving a long tail, and with the tapestry needle draw the stitches and gather tightly and fasten off.

 To make up : 
Join the row ends,but leave 3 inches open near the head for easy stuffing. Also do not close the bottom yet.
Insert the legs at the bottom of the body and sew in place. Now stuff the body and the head firmly and sew  the gap near the head. The enter seam is the back of the doll.

 To form the neck :

Take a length of the yarn matching to the face and  gather around the first knitted row of the head and pull the stitches tightly and fasten off. 

Neck edging:

For the neck edging use white yarn and cast on 40 sts and cast off. Sew this around the neck.

Frilly skirt:

Using red cast on 110 sts.
G-St for 2 rows
Beginning with a knit row St -St for 12 rows.
Next row k2tog to end-55 sts.
Cast off.

To make up: join the row ends together, turn the skirt right side out and now place the skirt near the waist and catch two sts at a time while sewing in order to get the frills all around the waist, so that the skirt should fit correctly near the waist. Make sure the center seam is at the back of the doll.

Waist band :
Using white cast on 55 sts and cast off. Sew this around the waist.

Back bow :
With white yarn and using a crochet hook make a chain of single crochet for about 6 to 7 inches or a twisted chord. Make a bow and sew at the back of the frock at the center of the waist band as shown in the illustration.

Polka dots:
To make polka dots cut small circles using white and glue them here and there all around the dress .

Arms: ( make two )

With light brown cast on 7 sts
Next row : purl
Inc k wise into every stitch - 14 sts 
Continue in st-st and work 16 rows
Break off the skin color and join white for the sleeve edging
G -st for 2 rows , break off white and join red for the sleeves
Next row:  Inc k wise into every stitch- 28 sts 
Continue in the st- st and work 5 rows.  
Next row : k2tog to end - 14 sts .  
Leave the stitches on the needle leaving a long tail, and then with a tapestry needle draw through the stitches and pull the stitches tightly and fasten off.

To makeup :
Join the row ends together leaving the bottom of the hand open. Stuff the hands firmly and then gather the stitches at the bottom and pull them tightly. 
Sew the hands in front of the body just 2 sts below the neck edging.

Face :

Eyes : 
Cut two small circles With black and white felt. First put some glue on the white felt glue them at the enter of the face 8 rows above the neck. Then glue the black felt little bit below the white felt. ( note : Aleene's fast grab tacky glue is best to glue the felt )

Mouth: with black yarn embroider a small 'V' shape 4 rows above the neck.

Nose: use the skin color or a darker shade than the skin color and make two small horizontal stitches just below the eyes.

Hair:
Main piece:
Using black cast on 80 sts.
Next row : k1, insert the right hand needle K wise into the next st on the left hand needle, yarn over twice and then draw through all the three sts,continue this way till the last st and K1 
Next row : K1, K2tog to end,K1
Cast off.
Place this on the dolls hair 7 rows above the head forming a 'U' shape such that some hair is hanging below the shoulder. Now sew the hair in place all over except the hair falling below the shoulder.
Now again cast on 80 sts and repeat the process and arranging the rows of hair till the head is completely covered by the hair leaving the hair to dangle below the shoulder.
Now with the hair that is dangling tie two ponytails on either sides and secure the ponytails with a piece of black yarn. Once the ponytails are secure tie a piece of ribbon on either sides of the ponytails.

Front piece of the hair.
With black cast on 10 sts,
Next row : k1, insert the right hand needle K wise into the next st on the left hand needle, yarn over twice and then draw through all the three sts,continue this way till the last st and K1 
Next row : K1, K2tog to end,K1
Cast off.
Place the castoff edge in front of the forehead and sew the castoff edge to the main piece of the hair.

Hat
Using white cast on 50 sts.
Beginning with a K row st-st for 6 rows.
Shape the hat.
K3,k2tog to end - 40 sts.
Purl
K2,K2tog to end - 30 sts,
Purl
K1, K2tog to end - 20 sts,
Purl
K2tog to end.- 10 sts.
Leave the sts on the needle and cut the yarn leaving a long tail. With a tapestry needle draw through all the sts and pull tightly and fasten off.

Hat front :
With white cast on 50 sts.
G- St for 2 rows.
Cast off.

To make up :
Join the row ends of the hat, turn the hat right side out , stuff the hat a little and place on the doll's head and sew in place.
Join the row ends of the hat  front turn it right side out and sew the cast on edge to the hat.

Hat band:
Using red Cast on 50 sts and cast off. Sew this around the hat. 

Flower :

Cast on 10 sts using red .
Cut the yarn leaving a long tail, with the tapestry needle draw through all the stitches, forming a shape of a flower. Sew this in the front of the hat just above the hat band.
With green yarn embroider some stitches in the middle of the flower.


Monday, February 17, 2014

Miss. Robin


Greetings friends!

This is the Last doll of this project, and this completes the entire set that I was planning.
As I had mentioned in my last two blogs I am going to reveal where, and how I was inspired to make these three dolls. Before I proceed meet Miss.Robin. 


Few days ago I decided that I should try designing  some dolls, but was not sure how to begin. When I was giving a thought about this it occurred to me that I should go to the library and find some storybooks from the children's section. I know many designers get their inspiration from story books and fairy tales. So I followed the same procedure as well.

When I was browsing through the books I found this book from Mabel Lucie Attwell. Unfortunately this book in written in Spanish could not understand a thing, there were no English version in this particular library. I still borrowed the book since I liked all the illustrations and got inspired. I have heard about the author before but this is the first time I got to look at her book.
  • (Mabel Lucie Attwell was a British illustrator. She was known for her cute, nostalgic drawings of children, based on her daughter, Peggy. Her drawings are featured on many postcards, advertisements, posters, books and figurines.Wikipedia)


  • Among all the illustrations in the book, this one is my favorite, so decided to make three dolls a boy and two girls and make them pose and take a picture just like how it's in the book.


    Look at these little rascals how they are whooping and guffawing about something. How I miss those childhood days.


    I am happy the way it has turned out and this project has inspired me to design some more dolls.


    I am already hatching a plan about my next project which is also inspired by another storybook which I will be revealing once the dolls are complete.

    Till then 
    You stay classy craft world!


    Friday, February 14, 2014

    Valentine's day special

    Greetings!

    Since today is valentines day I just thought I will give a chance for Bobby to ask Polka Dot out. Bobby is wooing Polka Dot for quite a long time, I hope she will agree to be his valentine and they will have a nice evening together.


    Besides this I just wanted to cherish my first valentine's day. My first valentine's day celebration happened in India. My boy friend who is my husband now took me to an Indian restaurant we had a nice South Indian meal and then we spent rest of the afternoon in a park surrounded by a lake. When it  was time to part and for my boy friend to take me back home, he removed a box which he had kept in a dicky of his two wheeler and inside the box was a choker with a beautiful heart pendent. His mother who is my mother-in-law now had given this necklace to him to gift me, that was nice of her. I had never imagined that my boy friend will gift me something that day :), it was a delightful surprise and my boyfriend made it even more special by keeping it a secret till the last minute.

    At the end I am quite happy that through my dolls I can recall some of my wonderful memories over and over again.

    Last but not the least 'Happy Valentine's Day' to everyone.

    My next project is almost on the verge of finishing. I will soon be back with my next post.

    Till then, as I always say,
    You stay classy craft world!


    Tuesday, February 11, 2014

    Miss Robin


    Materials required:
    Royal blue worsted yarn for the dress and the shoes
    Light yellow worsted yarn for the body
    White color worsted yarn for the hat and socks 
    Maroon worsted yarn for the hair
    Two decorative buttons for the shoes front
    Two or three different types of ribbons
    Printed felt with flower design to glue on the dress.
    Aleene's fast grab tacky glue or any other craft glue
    Poly fill for stuffing
    Two small vowel shape blue and white felt
    Small piece of red felt for the mouth
    Black acrylic paint to paint eyelashes
    Blush or red colored pencil for the cheeks
    A pair of USA #2 knitting needles
    Tapestry needle.

    Measures: approximately 81/2" in height excluding the cap.  The doll can stand without any support once the cardboard soles are inserted and it can sit when it's leaned against a wall etc.

    Skills required : cast on, cast off, knit, purl, increase and decrease.

    ( please do not post this pattern as yours. Please do not sell this pattern as yours. However, you can sell the dolls made from this pattern)

    Method:

     Shoes  and legs (make two alike )

    Begin at the sole and using Royal blue color  cast on 8 sts.

    Row 1: increase knit wise into every stitch  16 sts 
    Row 2: purl 
    Row 3: knit
    Row 4: purl
    Row 5: increase knit wise into every stitch  (32 sts)
    Row 6: purl
    Row 7: (k 10, (k2tog,k2) 3 times, k10 - 29 sts)
    Row 8: purl
    Row9: ( k10,(k2tog, k1) 3times, k10 - 26 sts)
    Row10: purl
    Row11: (k 10, ( k2tog) 4 times , k 8 - 22 sts )
    Row 12: purl 
    Break off the yarn and join the white color for the socks .
    Continue and work in st-st for 8 rows beginning with a k row.
    Next row:  ( k1, (k2tog to last st) ,k1 -12 sts)
    Next row:  ( k2tog, k8, k2tog - 10 sts )
    Break off the yarn and join the light yellow for the legs. 
    Increase knit wise into every st 20sts 
    Beginning with a purl row work in st-st for 17 rows
    Cast off.

    To make up :
    Join the row ends together, leaving the top open for stuffing. Place the leg on a cardboard and trace the sole, cut four pieces in order to get stiff sole. Insert two cardboard pieces  for the sole for each leg and then stuff the legs firmly, but do not fill the legs completely. At the top edge leave 1/8th inches with out filling in order to insert the legs easily inside the body. Keep these aside for now till they are  required .

    For the ankle straps cut a length of ribbon and glue around the ankles just above the socks.

    Sew two decorative buttons in the front of the shoes.

    Body and Head.

    Begin at the lower body of the doll and with white color cast on 40 sts.
    Beginning with the knit row st-st for  11 rows .
    Break the yarn and join the royal blue color for the upper body. 
    Beginning with a purl row st-st for 11 rows .
    Next row (k1,k2tog to last st )k1 27 sts.
    Purl 1row
    Break the yarn and join the light yellow color for the head.
    Next row : (k1, inc 1 to last st, )k1 -40sts
    Purl one row. 
    Next row: (k5, inc knit wise in the next st ) 6 times, k4 -46 sts.
    Beginning with the purl row st -st for  17rows.
    Next row: (k2, k2tog to last 2 sts) k2 - 35 sts.
    Purl 1 row.
    Next row:( k1, k2tog to last st, )k2- 24 sts.
    Purl 2tog to end 12 sts.
    Leave the sts on the needle and cut the yarn leaving a long tail, and with the tapestry needle draw the stitches and gather tightly and fasten off.

     To make up : 
    Join the row ends,but leave 3 inches open near the head for easy stuffing. Also do not close the bottom yet.
    Insert the legs at the bottom of the body and sew in place. Now stuff the body and the head firmly and sew  the gap near the head.

     To form the neck :

    Take a length of the yarn matching to the face and  gather around the first knitted row of the head and pull the stitches tightly and fasten off. 

    Neck edging:

    For the neck edging take a length of ribbon and glue all around the neck.

    Skirt for Robbin 

    With white cast on 66 sts.
    G-st for two rows. Break off white and join Royal blue.
    Beginning with a knit row St-st 14 rows.
    Next row: K1,K2tog to end. -44 sts.
    Purl one row
    Knit one row.
    Cast off knit wise.

    To make up : join the row ends of the skirt and turn the skirt right side out. Place the skirt on the doll on the first row of the white and sew in place. Make sure the center seam is at the back of the doll. 
    Cut a length of a ribbon and glue around the waist leaving a long tail on either sides on the back to tie a bow.
    Take a piece of felt with the floral prints. Cut the flowers and glue all over the dress.

    Arms: ( make two )

    With the color matching the face cast on 7 sts
    Next row : purl
    Inc k wise into every stitch - 14 sts 
    Continue in st-st and work 7 rows
    Break off the skin color and join royal blue for the sleeves
    G -st for 2 rows.
    Next row: k1, inc in the next st , ( k3,inc in the next st ) 3 times - 18 sts 
    Continue in the st- st and work 17 rows.  
    Next row : k2tog to end - 9 sts.  
    Leave the stitches on the needle leaving a long tail, and then with a tapestry needle draw through the stitches and pull tightly and fasten off.

    To makeup :
    Join the row ends together leaving the bottom of the hand open. Stuff the hands firmly and then gather the stitches at the bottom and pull them tightly. 
    Sew the hands in front of the body just 1 st below the neck. ( below the ribbon )
    Glue the hands with a piece of ribbon near the wrist.

    Face :

    Eyes : 
    Cut two small vowel shape With blue and white felt. First put some glue on the white felt glue them at the enter of the face 8 rows above the neck. Then glue the blue felt little bit below the white felt. ( note Aleene's fast grab tacky glue is best to glue the felt )
    With black acrylic paint three small eye lashes just above the eyes.

    Mouth: cut a small heart shape from a red felt and glue 4 rows above the neck.

    Nose: use the skin color or a darker shade than the skin color and make two small horizontal stitches just below the eyes.

    Hair:

    With maroon wind the yarn 12 times around a cardboard piece sew through the stitches in the front and at the back of one side of the card board and cut through the loops in the front and at the back of other side of the cardboard.
    Now place the yarn on the dolls head just 4 rows above the eye lashes.
    Now sew these strands of yarn all around so that the scalp is not visible, leaving a length of yarn below the neck to plait the hair. Repeat this 2 or 3 more time or till the head is covered completely with the hair.
    Now make two plaits and tie the hair with the length of yarn matching the hair color and then tie a ribbon and make a bow. Trim the hair to equal length.


    Hat
    Using white cast on 50 sts.
    Beginning with a K row st-st for 6 rows.
    Shape the hat.
    K3,k2tog to end - 40 sts.
    Purl
    K2,K2tog to end - 30 sts,
    Purl
    K1, K2tog to end - 20 sts,
    Purl
    K2tog to end.- 10 sts.
    Leave the sts on the needle and cut the yarn leaving a long tail. With a tapestry needle draw through all the sts and pull tightly and fasten off.

    Hat front :
    With white cast on 50 sts.
    G- St for 2 rows.
    Cast off.

    To make up :
    Join the row ends of the hat, turn the hat right side out , stuff the hat and place on the doll's head and sew in place.
    Join the row ends of the hat  front turn it right side out and sew the cast on edge to the hat.
    Now take a length of a ribbon and glue all around the hat and then cross at the back of the hat.


    Monday, February 10, 2014

    Bobby.


    Greetings friends,

    My adventure in designing dolls continues again and the result is this boy called "Bobby". He is my second creation.

    It was a great experience again. This is the first time I knitted a boy doll. I tried my best to make him look  like a boy. After designing two dolls I realized that the toughest part is to make the face and the hair. I only know one or two ways to make hair and facial features, I should now think of different ways. People have already tried and tested different ways I can only try to improvise on what others have done I guess. I have no idea how I am going to think different ways but I should give it a try if my dolls have to look different.

    When I designed 'Miss Polka Dot' I did not jot down the pattern as and when I tried the doll, as a result I forgot the gauge for this doll and ' Bobby' became slightly bigger than the other doll. But I am still quite happy with the results. 


    It also took a long time to design his dungarees. I tried three times and finally I achieved something but it's not up-to the mark yet. After I sewed the overalls onto the doll the finishing is not quite good. This time I also made it a point to jot down the pattern as and when I made the doll. The pattern is not in order but I have the complete pattern I guess. 
    I realized how tricky it is to write the pattern. I really admire the great designers like Jeangreenhowe. All her patterns come with  so much details, and all her patterns are so well written. 
    I felt that his overalls require some design, I did not want to embroider anything since I am not good at it, so I decided to glue some design. Fortunately I had some cute ribbons that I had purchased from Michael's few days ago and puppy suites well for a boy. The color of the ribbon also matched the overalls.

    The picture background is inspired by this illustration  of 'Mabel Lucie Attwell '. I love all her illustrations.


    The inspiration to make these dolls will be revealed in my next blog. I will next be designing another girl doll and I hope it will come out well. 

    So see you soon with my next doll ;)

    Till then,
    You stay classy craft world !